So we use Vim to edit the .VIMRC:
vim ~/vim/.vimrc
As with most Linux tools, the behavior, appearance and extension of Vim's functions are regulated and configured here. The .VIMRC is written in human-readable format and can therefore be easily modified (assuming you know the variables). Here are a few simple entries that make using Vim much nicer and more pleasant.
syntax on (activates syntax highlighting)
set number (activates line numbers)
colo iwtb (uses the iwtb colorscheme)
filetype plugin on (Vim recognizes which highlighting based on the extension)
set laststatus 2 (activates status bar)
set history=1000 (saves the last 1000 commands that were used)
With the 6 entries, Vim is easier to use and looks much better and no longer black and white. The IWTB colorscheme is available HERE.
These are, however, simple extensions or options that Vim comes with as standard - so they are basically basic configs. No extra plugins need to be installed here. However, if we want to use plugins, we need an entry for the plugin manager we are using (in my case, Pathogen). I have already covered plugins themselves in Part IV of the small Vim series here.
To make Pathogen the plugin manager, we need the following .VIMRC entry:
  execute pathogen#infect()
  call pathogen#infect()
... and Pathogen acts as a plugin manager.
KEYMAPPING
Keys can also be remapped in the .VIMRC. The ESC key, for example, as an exit from the modes, comes from the keyboards of the ADM-3A computers on which vi was developed. Here, ESC was directly next to "Q" and was therefore much easier to reach than on more modern keyboards where ESC has slipped into the bar with function keys. So why not map ESC to another key so that you can switch between the modes more quickly.The following entry in the .VIMRC is sufficient for this:
inoremap jj <ESC>
With this entry, you can exit INSERT mode with the key sequence "jj". Here, of course, it makes sense to use a character sequence that does not appear often in written text. The key sequence "er" would quickly become annoying.
The basic syntax of remapping is as follows:
map_mode <what_you_type> <what_is_executed>
There are three options for map_mode:
- inoremap (mapped keys in INSERT mode)
- nnoremap (mapped keys in NORMAL mode)
- vnoremap (mapped keys in VISUAL mode)
With these options, the keys can be defined very precisely.
So it's best to play around with Vim and pay attention to where adjustments and improvements can be made.
If you use the NERDtree plugin, you can save yourself the trouble of typing ":NERDtree" and map NERDtree to one of the F-keys:
nnoremap <F3> :NERDTreeToggle<cr>
But not only the mappings and basics are configured in the .VIMRC, but also the behavior of plugins. I use the plugin "startify" - this makes Vim look nice when it is opened without a file. In "startify" you can display the most recently opened files as well as static links to frequently used files, such as the .VIMRC, xmonad.hs or the xmobar-configfile - if you are creative you can also add cool ASCII art. What exactly "startify" configures is in the .VIMRC. This saves us a separate config file and the annoying search afterwards if you want to change something. My "startify" config looks like this:
  let g:startify_custom_header = [
  \ '   88  88 888888 888888 88   88 88 ',
  \ '   88  88 88  88 88     88  88  88 ',
  \ '   888888 888888 88     8888    88 ',
  \ '   88  88 88  88 88     88  88     ',
  \ '   88  88 88  88 888888 88   88 88 ',
  \ ]

  let g:startify_lists = [
  \ { 'type': 'files',	'header': ['    last modified:'] },
  \ { 'type': 'bookmarks', 'header': ['    bookmarks:'] },
  \ ]

  let g:startify_bookmarks = [ {'w': '~/vimwiki/index.wiki'}, {'v': '~/.vimrc'}, {'x': '~/.xmonad/xmonad.hs'}, {'b': '~/.config/xmobar/xmobarrc0'}]
This is what Vim looks like when it is started without any files to open:
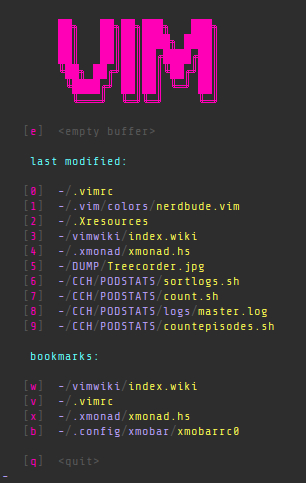
Also recht wenig Code für ein ganz schickes Ergebnis.
Statusline
The statusline is a feature that every editor needs and the end user needs too - be it simply to see how many lines of code you have written. The statusline can - who would have thought - be configured in the .VIMRC.First, as described above, the statusline is activated with "set laststatus=2" and displayed in Vim. The statusline can either only show information on the left, only on the right, or left and right. The .VIMRC entry then looks like this:
  set statusline+=\ %F\ %M\ %Y\ %R
  set statusline+=%=
  set statusline+=\ ascii:\ %b\ hex:\ 0x%B\ row:\ %l\ col:\ %c\ percent:\ %p%%
What does all this junk mean now?
The line "set statusline+=\ %F\ %M\ %Y\ %R" starts writing the assigned parameters into the status line on the left. The variables stand for:
%F – Shows the full path to the opened file
%M – Shows whether the file is saved or not
%Y – File type
%R – Shows if the file is read-only
The next line ("set statusline+=%=") that follows acts as a separator to split the status line into two parts.
The right side of the status line is then configured. This works in the same way as the left side. Of course, displaying the same thing as on the left side makes little sense:
That's why the next line looks a little different: "set statusline+=\ ascii:\ %b\ hex:\ 0x%B\ row:\ %l\ col:\ %c\ percent:\ %p%%"
%b – Shows the ASCII/Unicode character under the cursor.
0x%B – Shows the hexadecimal character under the cursor.
%l – Shows the line number in which the cursor is.
%c – Shows the column number in which the cursor is.
%p%% – Shows the position of the cursor in percent.
For more information and parameters, it is always worth taking a look at the help. To do this, you can use the following command in Vim (in NORMAL mode) to display the help file. Here is an example of the status line help file.
help: statusline
As you can see, basic functions, color schemes, plugins and even the status line can be easily configured in one file. This is just a tiny part of the possibilities that are possible with the .VIMRC. As always, the easiest way is to use Github or Gitlab to get inspiration about what others have in their .VIMRC files and what you want to have too. Have fun configuring and playing around with the .VIMRC.
[~] BACK