But Vim offers more (as with everything). What if we want syntax highlighting, the folder structure, perhaps a nicer status line, etc.? There are plugins for that and the CULT OF VIM provides numerous plugins that greatly expand Vim's range of functions.
But before I get to the plugins themselves, let's briefly address the question of how plugins are used in Vim.
There are various plugin managers for Vim. The most well-known are the following:
Which one you use is of course up to you. I use PATHOGEN here and am very happy with it.
To install PATHOGEN, all you need is two simple terminal commands and an adjustment to the .VIMRC config file (I will discuss this in another part):
TERMINAL
  mkdir -p ~/.vim/autoload ~/.vim/bundle && \
  curl -LSso ~/.vim/autoload/pathogen.vim https://tpo.pe/pathogen.vim
The following line is inserted into the .VIMRC file and then Pathogen is ready for use:
.VIMRC
execute pathogen#infect()
Once you have completed these three steps, you can start installing plugins. Most plugins support use via Pathogen, which makes it quite easy to add plugins to Vim. This raises the next question: "Where can I find plugins?". On the one hand, you can of course search through Github, Gitlab and similar collections. But this can quickly become annoying and takes a lot of time. Luckily, there is VIMAWESOME. VIMAWESOME is a collection of Vim plugins that is wonderfully categorized and presented in a clear manner.
If you have now found a plugin that you want to use, installing it via Pathogen is quick and easy (here using NERDtree as an example):
.VIMRC
  cd ~/.vim/bundle
  git clone https://github.com/scrooloose/nerdtree
Done! Now you can display the file tree in Vim using the command ":NERDtree" which is entered in NORMAL mode. If we now want NERDtree to be started from the beginning, an entry must be made in the .VIMRC config file:
let g:NERDtree
Now we have created the basis for plugins. Below are a few plugins that I have installed and that I can currently recommend without reservation.
FUNKY PLUGINS
vim-startify
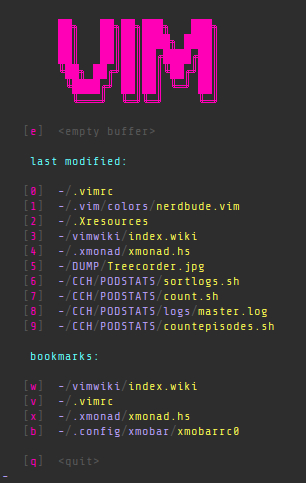
Vim-startify offers a beautiful start screen when Vim is started without specifying any files and is ideal if you have files that are edited frequently (configs) and you want quick access to them without typing the path to the file every time. Vim-startify has the option of displaying a list of recently opened files as well as static links to files that are used frequently.
But - and the eye also hacks - it also has the option of displaying a simple ASCII-art graphic (in my case the simple "HACK!"). Saves you a lot of typing and looks great too.
vimwiki
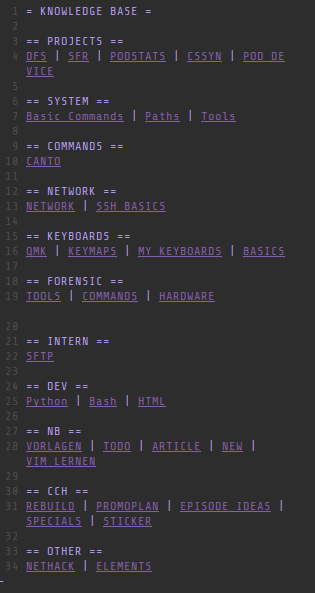
I have already written about VimWiki here (VIMWIKI). A small local wiki with which we store our notes, project data, tasks and anything else that our imagination can think of. In other words, everything a knowledge base needs. The pages are styled using Markdown and are a wonderful way to keep the confused thoughts at least sorted.
lighline

Vim's status bar is quite simple and straightforward. Unfortunately, it's also a bit boring. Luckily, there's Lightline for that. It replaces Vim's standard status bar with a prettier version. Lightline supports many themes and color schemes. So if you want something a bit more colorful, use Lightline.
colorizer
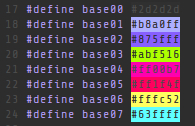
I often have to deal with HTML color codes here. It is practical if these are displayed immediately in Vim or in the code file. This is particularly useful when it comes to the NERDBUDE files or when you put together your own color schemes for your system.
NERDtree
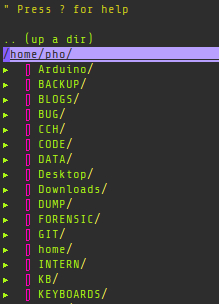
NERDtree, which we used as an example earlier, offers a file tree that can be displayed on the left or right in Vim. This means you no longer have to leave your Vim instance if you want to comfortably open other files.
Have fun wasting time searching for plugins!
[~] BACK