~~ uCONSOLE ~~
** A CYBERDECK FOR TERMINAL JUNKIES **
I’m a big fan of strange devices, cyberdecks, and input devices of all kinds. The Clockwork Pi uConsole is one of them. A compromise between a smartphone and a laptop, plus the unmistakable charm of a cyberdeck, making it ideal for terminal junkies.
uCONSOLE
The Clockwork Pi uConsole is a portable, Raspberry-based pocket computer with a keyboard, optional 4G module (spoiler: I don’t have one), a display, a trackball, and so on… sounds very tempting. What should also be mentioned, however, is that the uConsole is not entirely without controversy—more on that later.
So what do we have here?
THE DEVICE
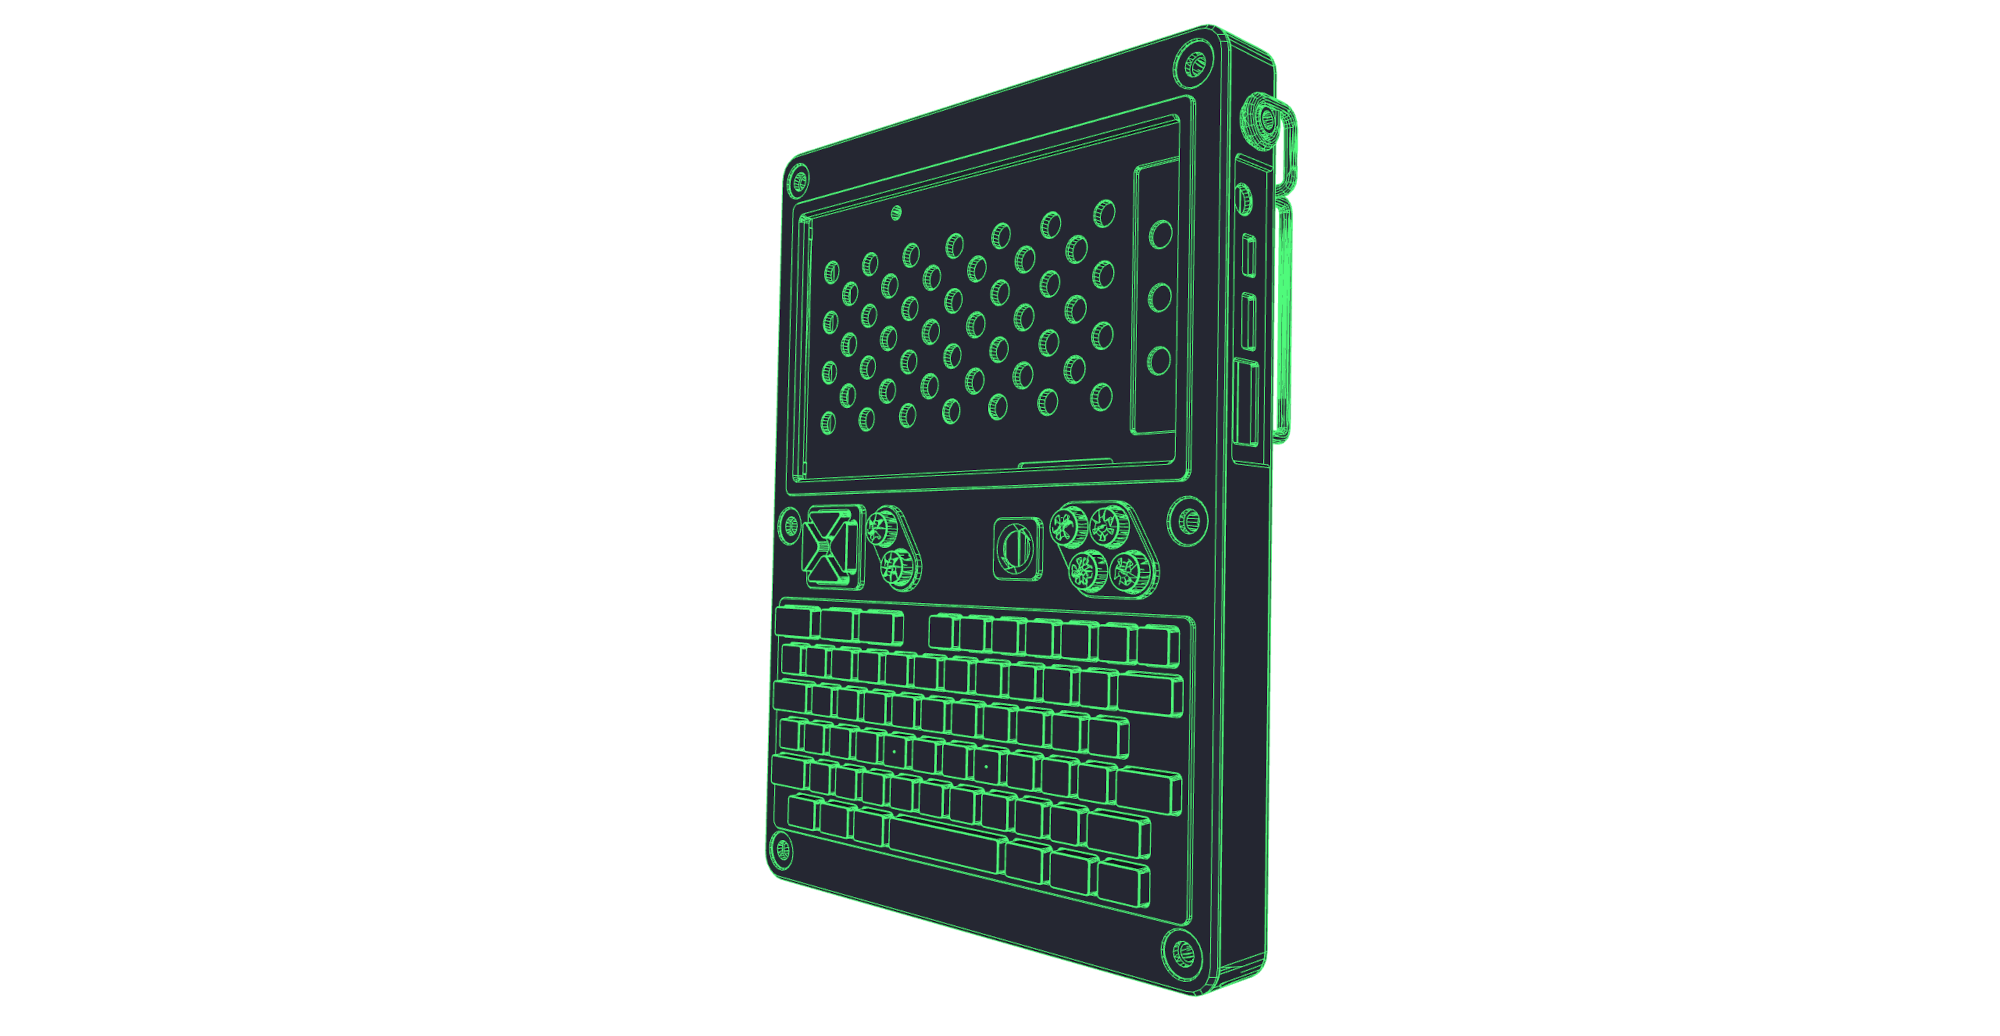
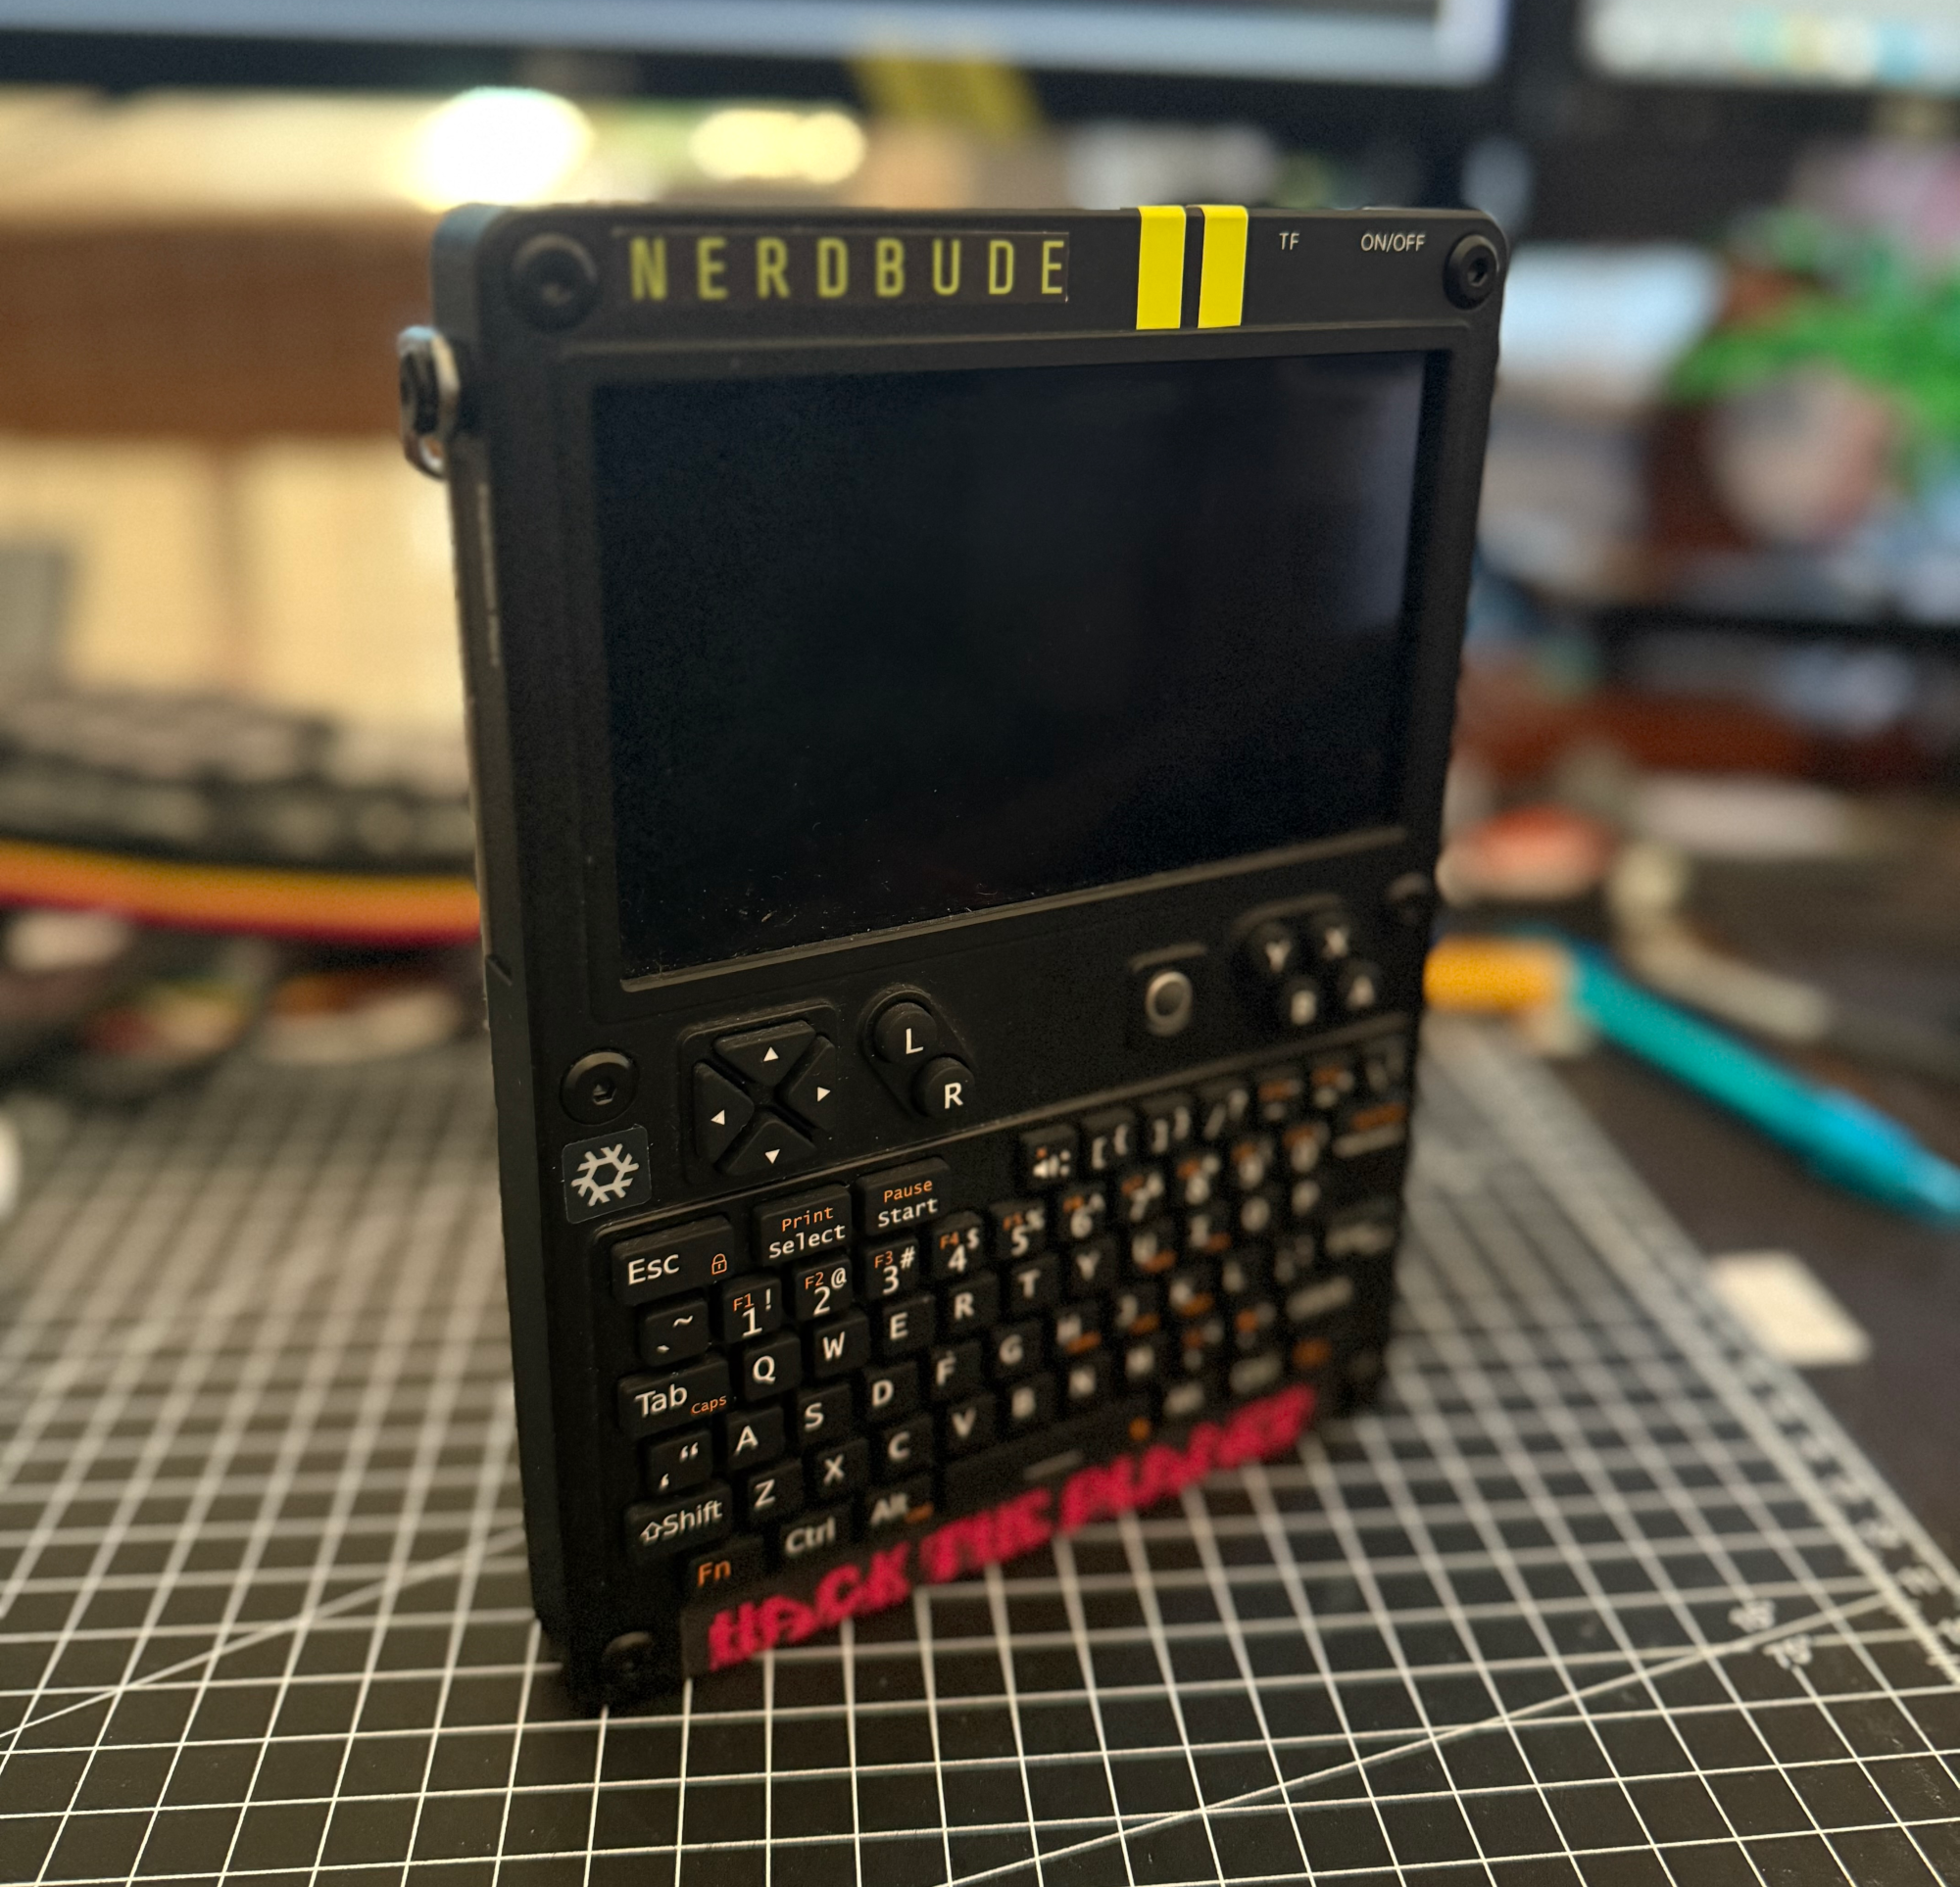
The uConsole is a 175mm x 131mm x 18mm device. The slogan “fantasy device” used to be emblazoned on the website, but it has since been changed to “make –field-programmable –cellular –fantasy uConsole.” At first, I also thought that “fantasy device” sounded a bit like a non-serious toy, but it’s far from that.
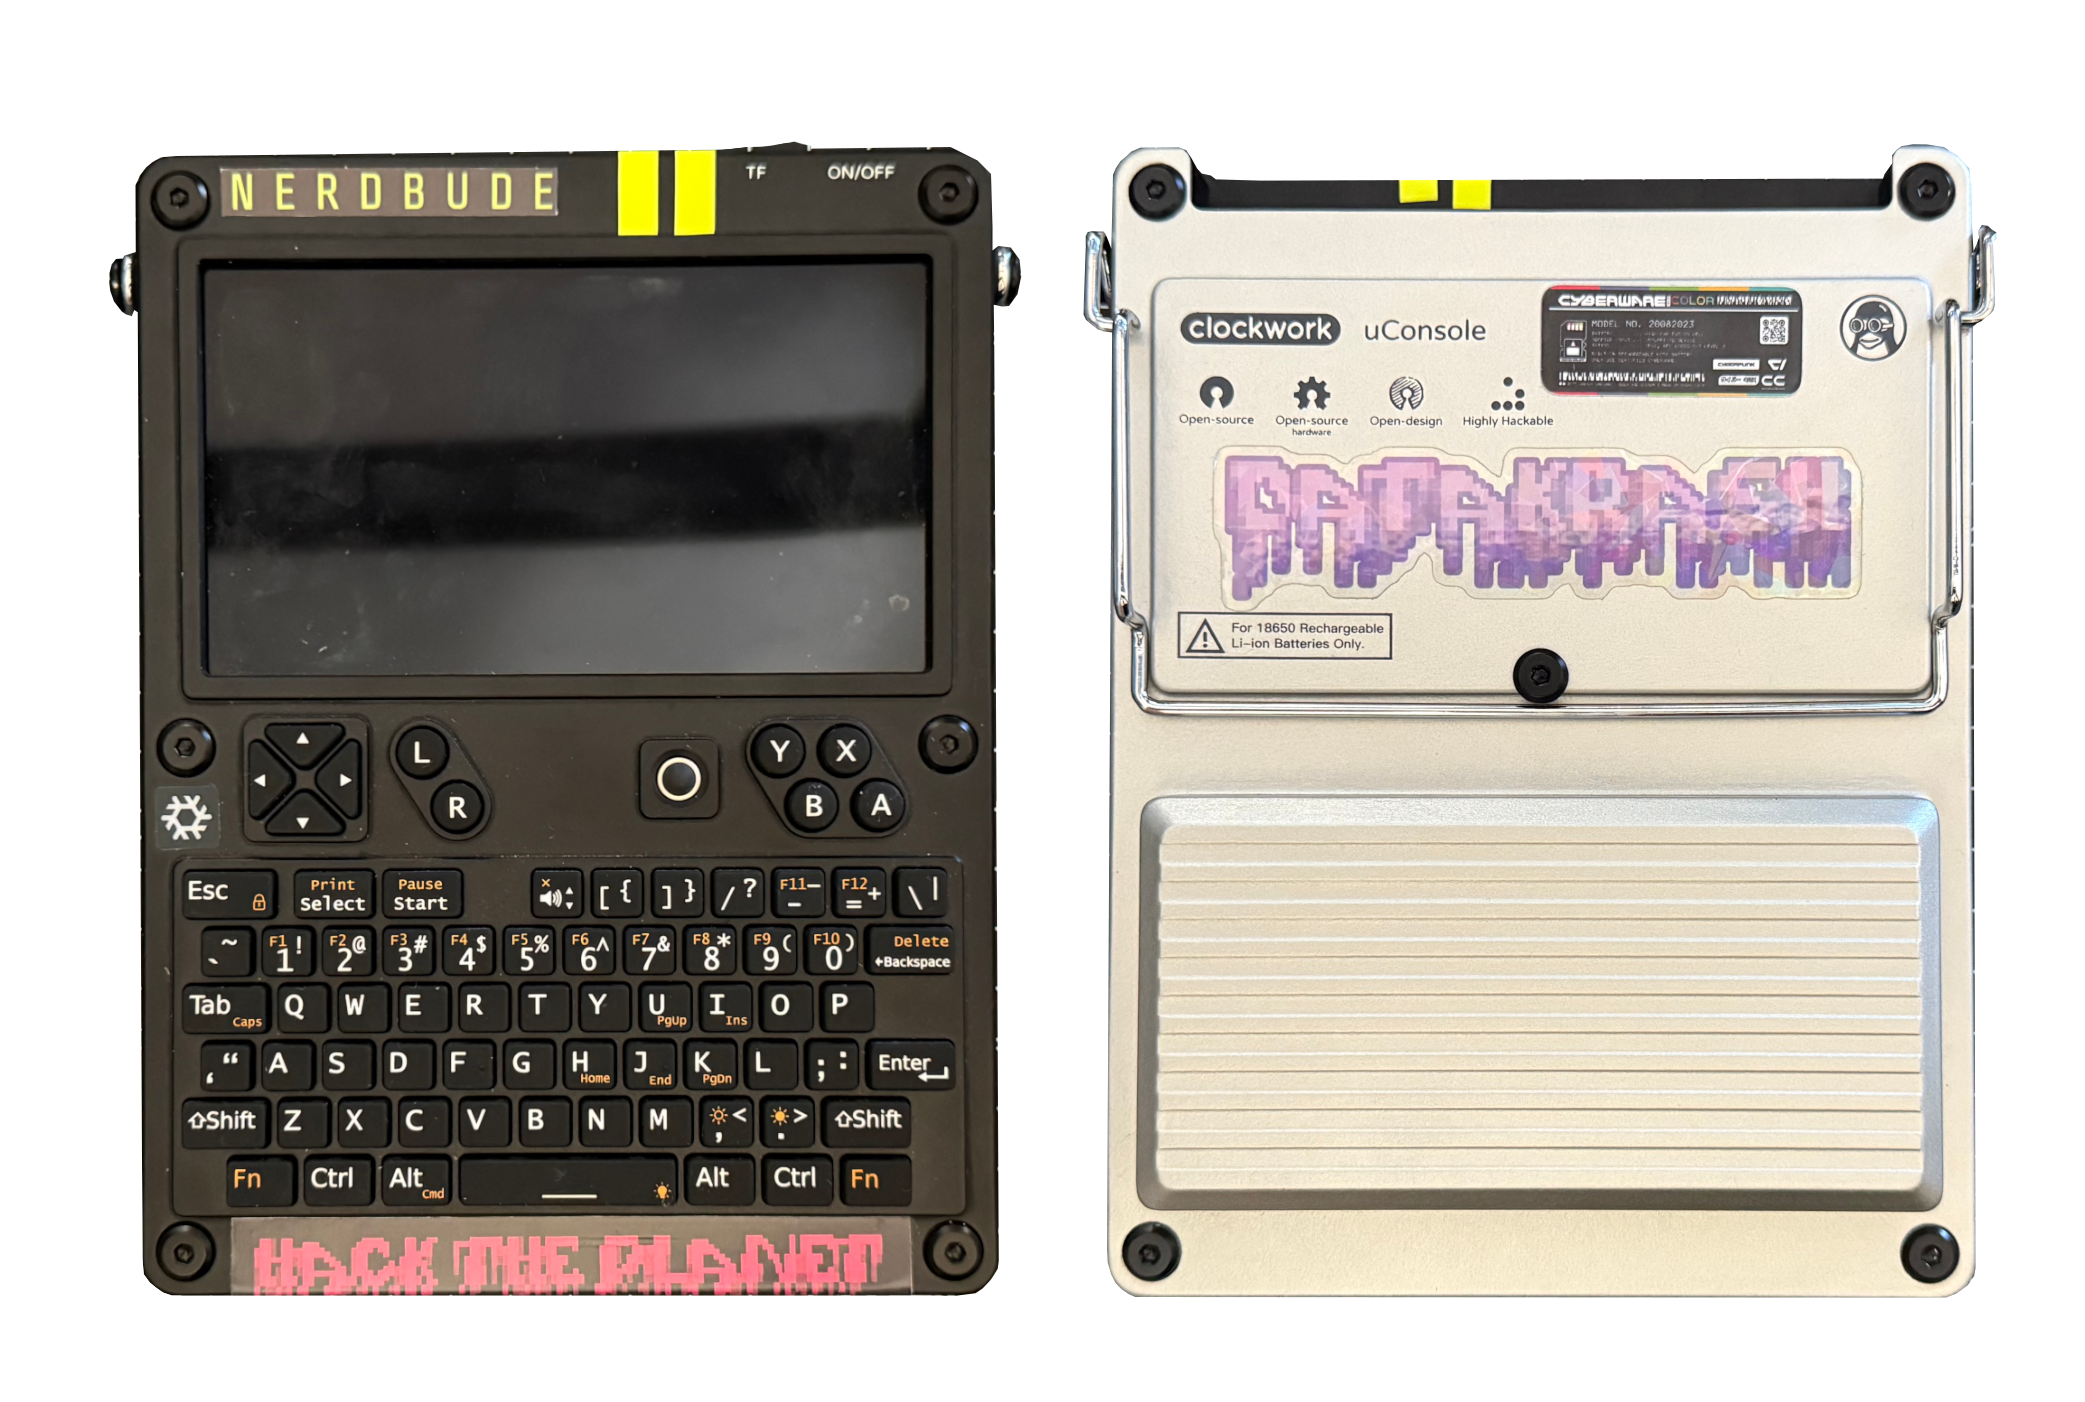
As is the case with electronic devices, there are of course different versions. The first decision is the color. The device is available in silver and black. Hackers, of course, have black devices ;)
There are a total of 4 different versions of internals:
R-01
This is by far the cheapest version with a RISC-V core module - but you have to want it (or order it and replace it with a CM4).
The specs are as follows:
1 RISC-V 64-bit Single-core RV64IMAFDCVU @ 1.0GHz
2 No GPU
3 1GB DDR3
and is described as a “highly experimental model.” Simple Debian-based distros can be installed without any problems, but the low performance is definitely noticeable. It’s great for getting used to the device, but for more advanced stuff, you need a different level of experience with RISC-V. So it’s not necessarily for beginners.
A-04
The A-04 kit is a bit more forgiving.
1 ARM64-bit Quad-core
2 Cortex-A53
3 Mali-T720
4 2GB DDR3
A bit more performance and a more widely used ARM64 chip offer a bit more convenience for beginners.
A-06
The A-06 kit offers a slightly improved performance:
1 ARM64-bit Dual-core
2 Cortex-A72
3 + Quad-core Cortex-A53
4 Mali-T864
5 4GB LPDDR4
So, a slight speed boost if the A-04 kit is too weak for you.
RPI-CM4 LITE
Last but not least, the RPI-CM4 LITE module. Here, you have the option of getting the uConsole directly with an RPi CM4 module. The CM4 module is as follows:
1 Raspberry Pi CM4 [104000] lite
2 ARM Cortex-A72 quad-core
3 4GB LPDDR4
4 WIFI 2.4 GHz
5 5.0 GHz IEEE 802.11 b/g/n/ac wireless
6 Bluetooth 5.0
7 BLE
However, this is also the most expensive version of the four. You can also opt for the RISC-V model (or one without a board) and purchase the CM4 module of your choice separately.
These are the four basic configurations that exist. The rest of the parts are the same for all models:
1 HD 720p 5.0-inch IPS screen
2 Clockwork ultra-portable QWERTY backlit keyboard
3 Battery module (without batteries)
4 Dual speaker
5 Shells and bracket system & 2.5mm hex key
6 ClockworkPi v3.14 mainboard revision 5
Just a quick note: if you want to use the CM4, you’ll need an adapter for your motherboard. It’s compatible up to CM3, but unfortunately, the pin layout has changed for the CM4 - so it’s best to order it at the same time.
The device comes with step-by-step assembly instructions and is very simple. You can’t go wrong, so I’ll skip the build guide here.
CRITICISM
As I wrote above, the device isn’t entirely without criticism – in fact, there are practically urban legends about it. If you research the device online, the first thing you read about is the incredibly long delivery times. Unfortunately, that falls under criticism, not legend. There are actually people who have waited about a year for the device. This depends entirely on the version ordered. The RISC-V and “boardless” variants are delivered significantly faster (approximately 3 months). I think this is due to the availability of the Raspberry Pi CM. What’s annoying, of course, is that resellers are given preferential treatment. It happens that uConsoles are available on relevant platforms within 3 weeks but cost significantly more. A shame. My tip here: simply order one of the RISC-V or boardless variants + CM adapter and order the actual CM4 from somewhere else. Then you still have the three-month wait, but that’s manageable.
On the subject of urban legends. There’s actually a theory that this device doesn’t exist and everyone who writes about it was bought by ClockworkPi or is a bot. Anyway, I have one. It seems to exist. :D
Once you can call one of these devices your own, it’s definitely incredibly fun to hack around with it. This is not least due to the community doing their best to convert all operating systems for it, including NixOS.
NIXOS
Of course, the uConsole should run the wonderful NixOS. Fortunately, I’m not the only one who wants it that way. Thanks to voidcontext and johndoe for the great work, there’s a prebuilt image for the Raspberry CM4 that can be flashed into the eMMC. For those who know more about NixOS than I do, there’s the option to build the image yourself. The special thing here is that you want to build the image so that the screen, keyboard, and all ports work right from boot, so you can (theoretically) get started right away. So I grabbed the prebuilt image and installed it on my CM4. Unfortunately, the whole thing doesn’t work without a small detour. First, you need a special board to flash the eMMC - in my case, the Wave Share IO Base.
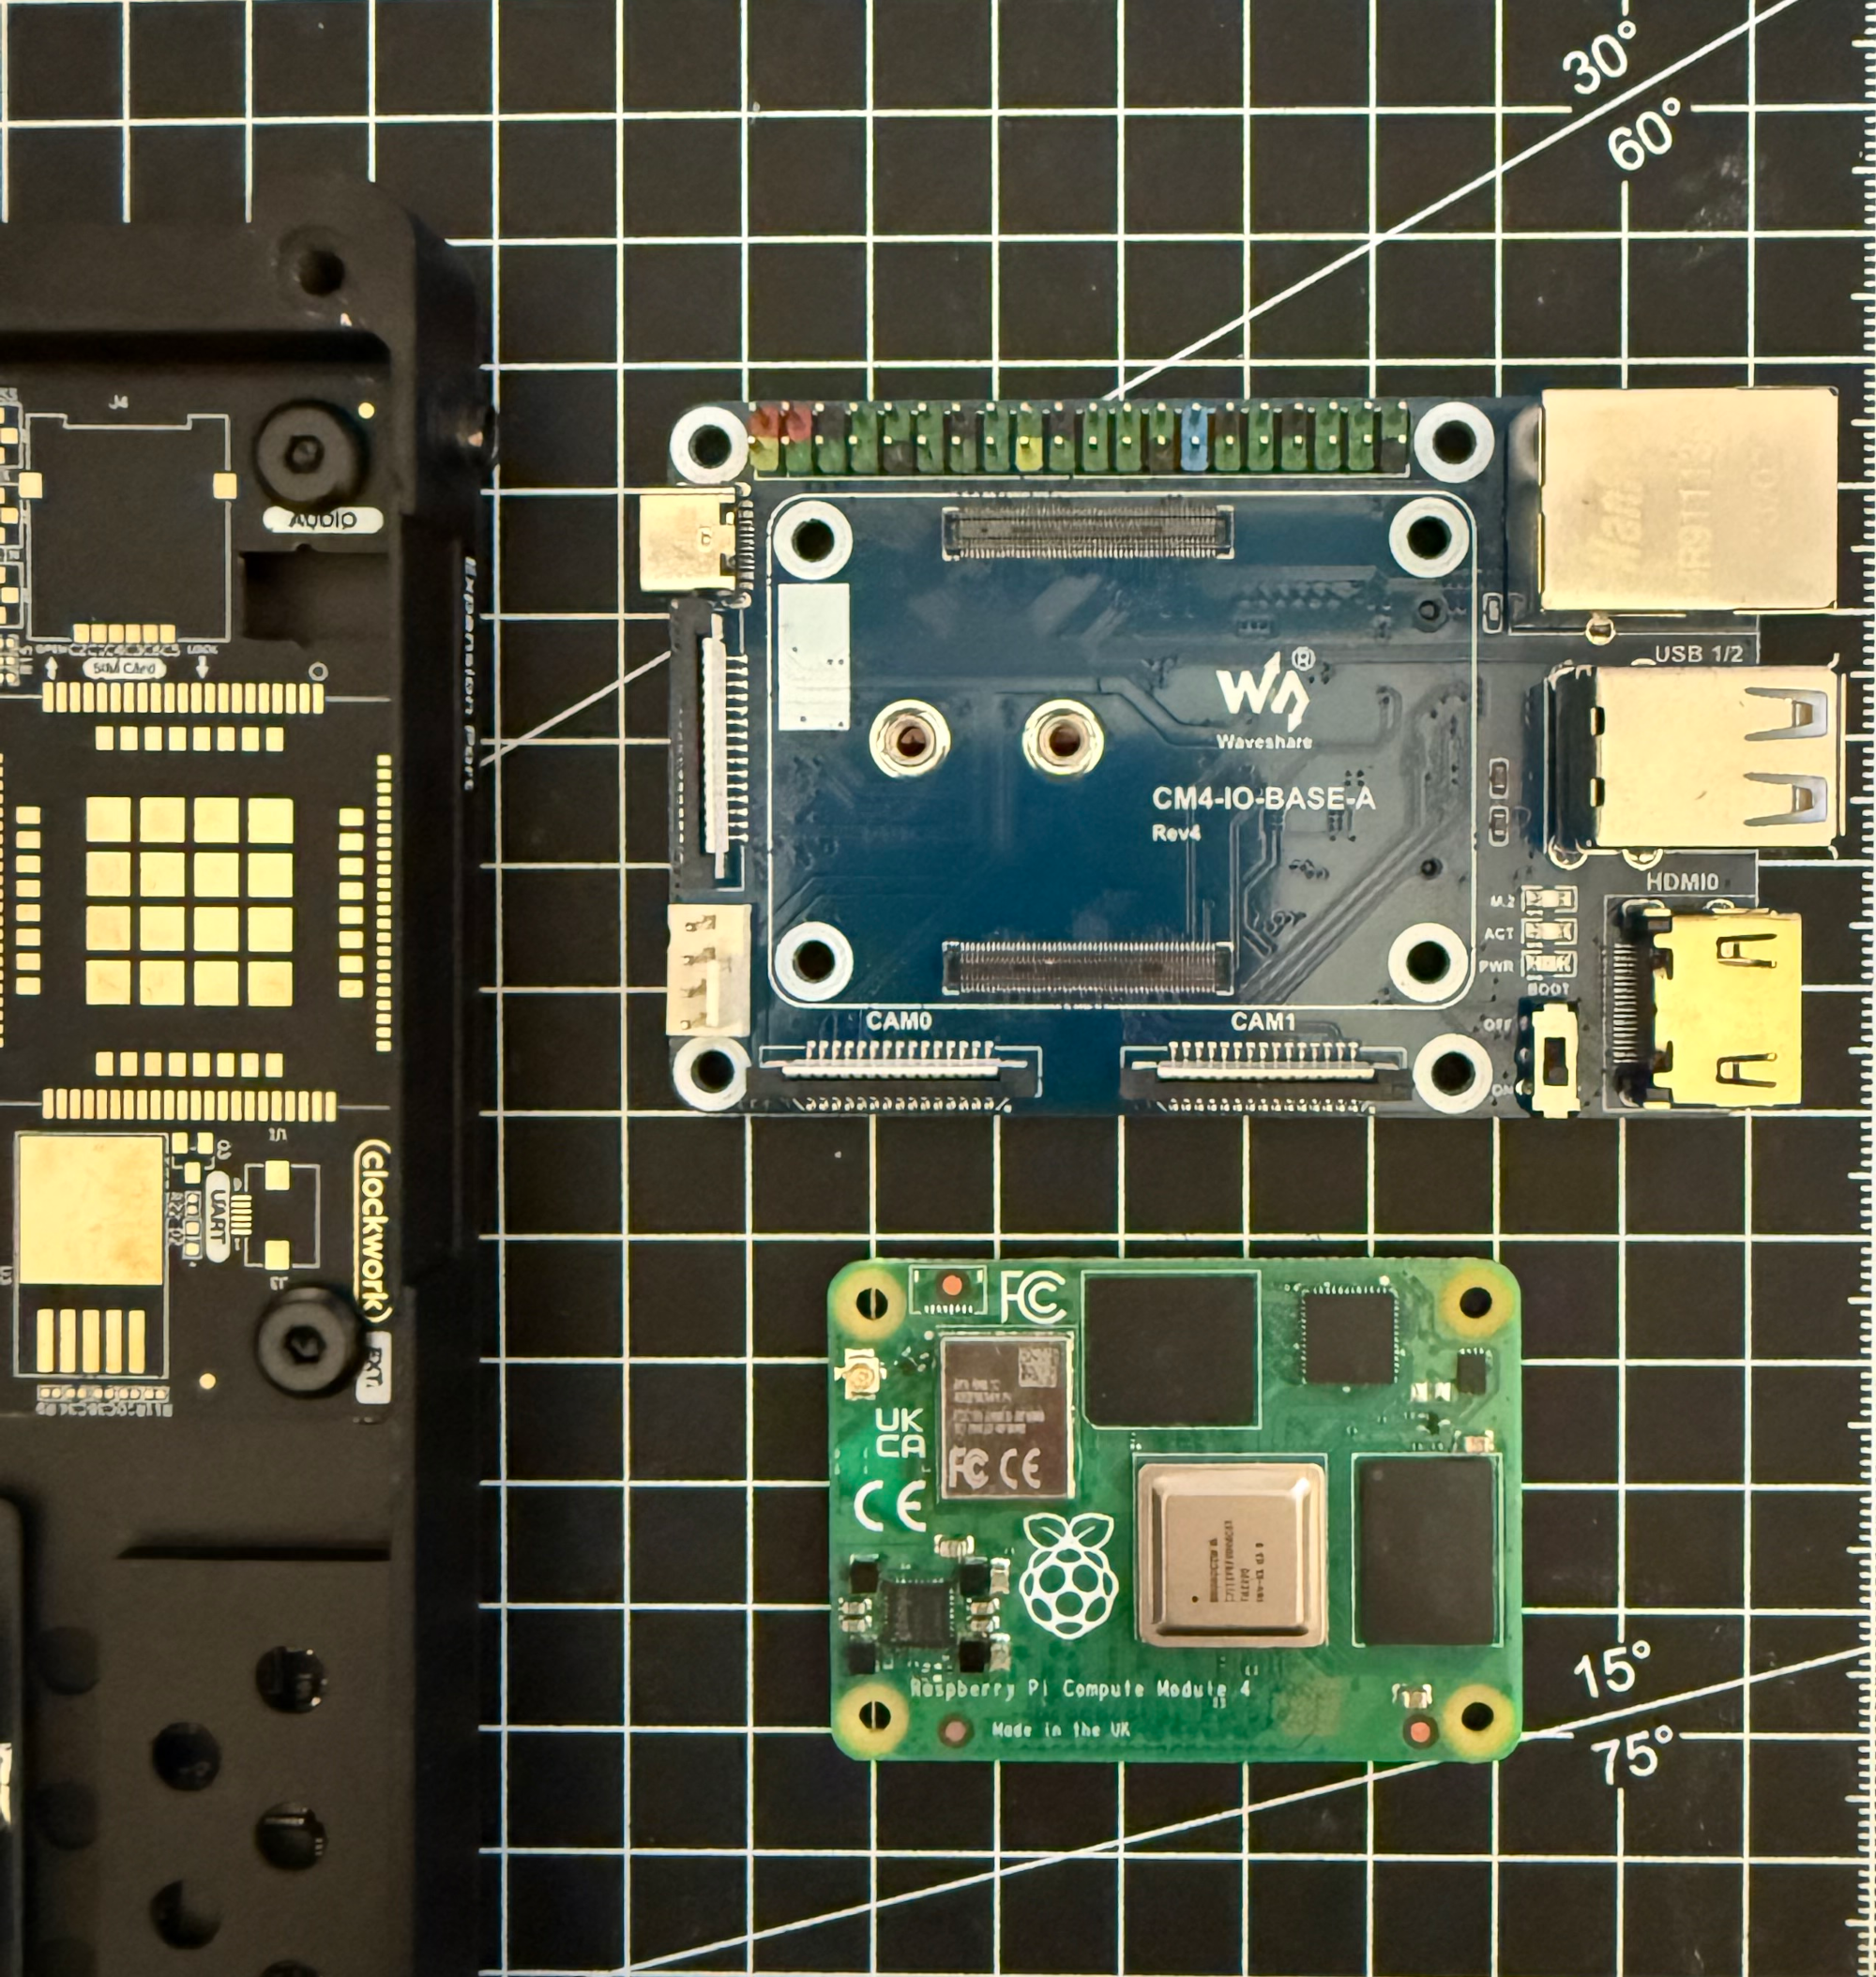
That’s the basics - everything else is software. For the CM4 to be recognized as a device, it needs a tool called rpiboot. This is located in the NixOS packages. In my case, I only need it temporarily. So I can make it available with nix-shell:
1nix-shell -p rpiboot
Now we have everything we need. So we plug the CM4 module onto the breakout board, set the switch to boot = on, and connect the board to the computer via a USB-C (data) cable. Then we start rpiboot with the following command:
1 rpiboot
The whole process then runs and sets up the CM4 as an available device.
You can check whether it worked with lsblk. Note: It may take a moment for the device to become visible. Once it is recognized, the image can be copied to the eMMC.
This works as usual with the command:
1 sudo dd if=path-to-image of=/dev/sdX bs=4M conv=fsync status=progress
After a short time, the image will be on the eMMC. Now you can reinstall everything, i.e., CM4 on the adapter board, adapter board in the uConsole, WLAN antenna on the CM4, and screw everything back together.
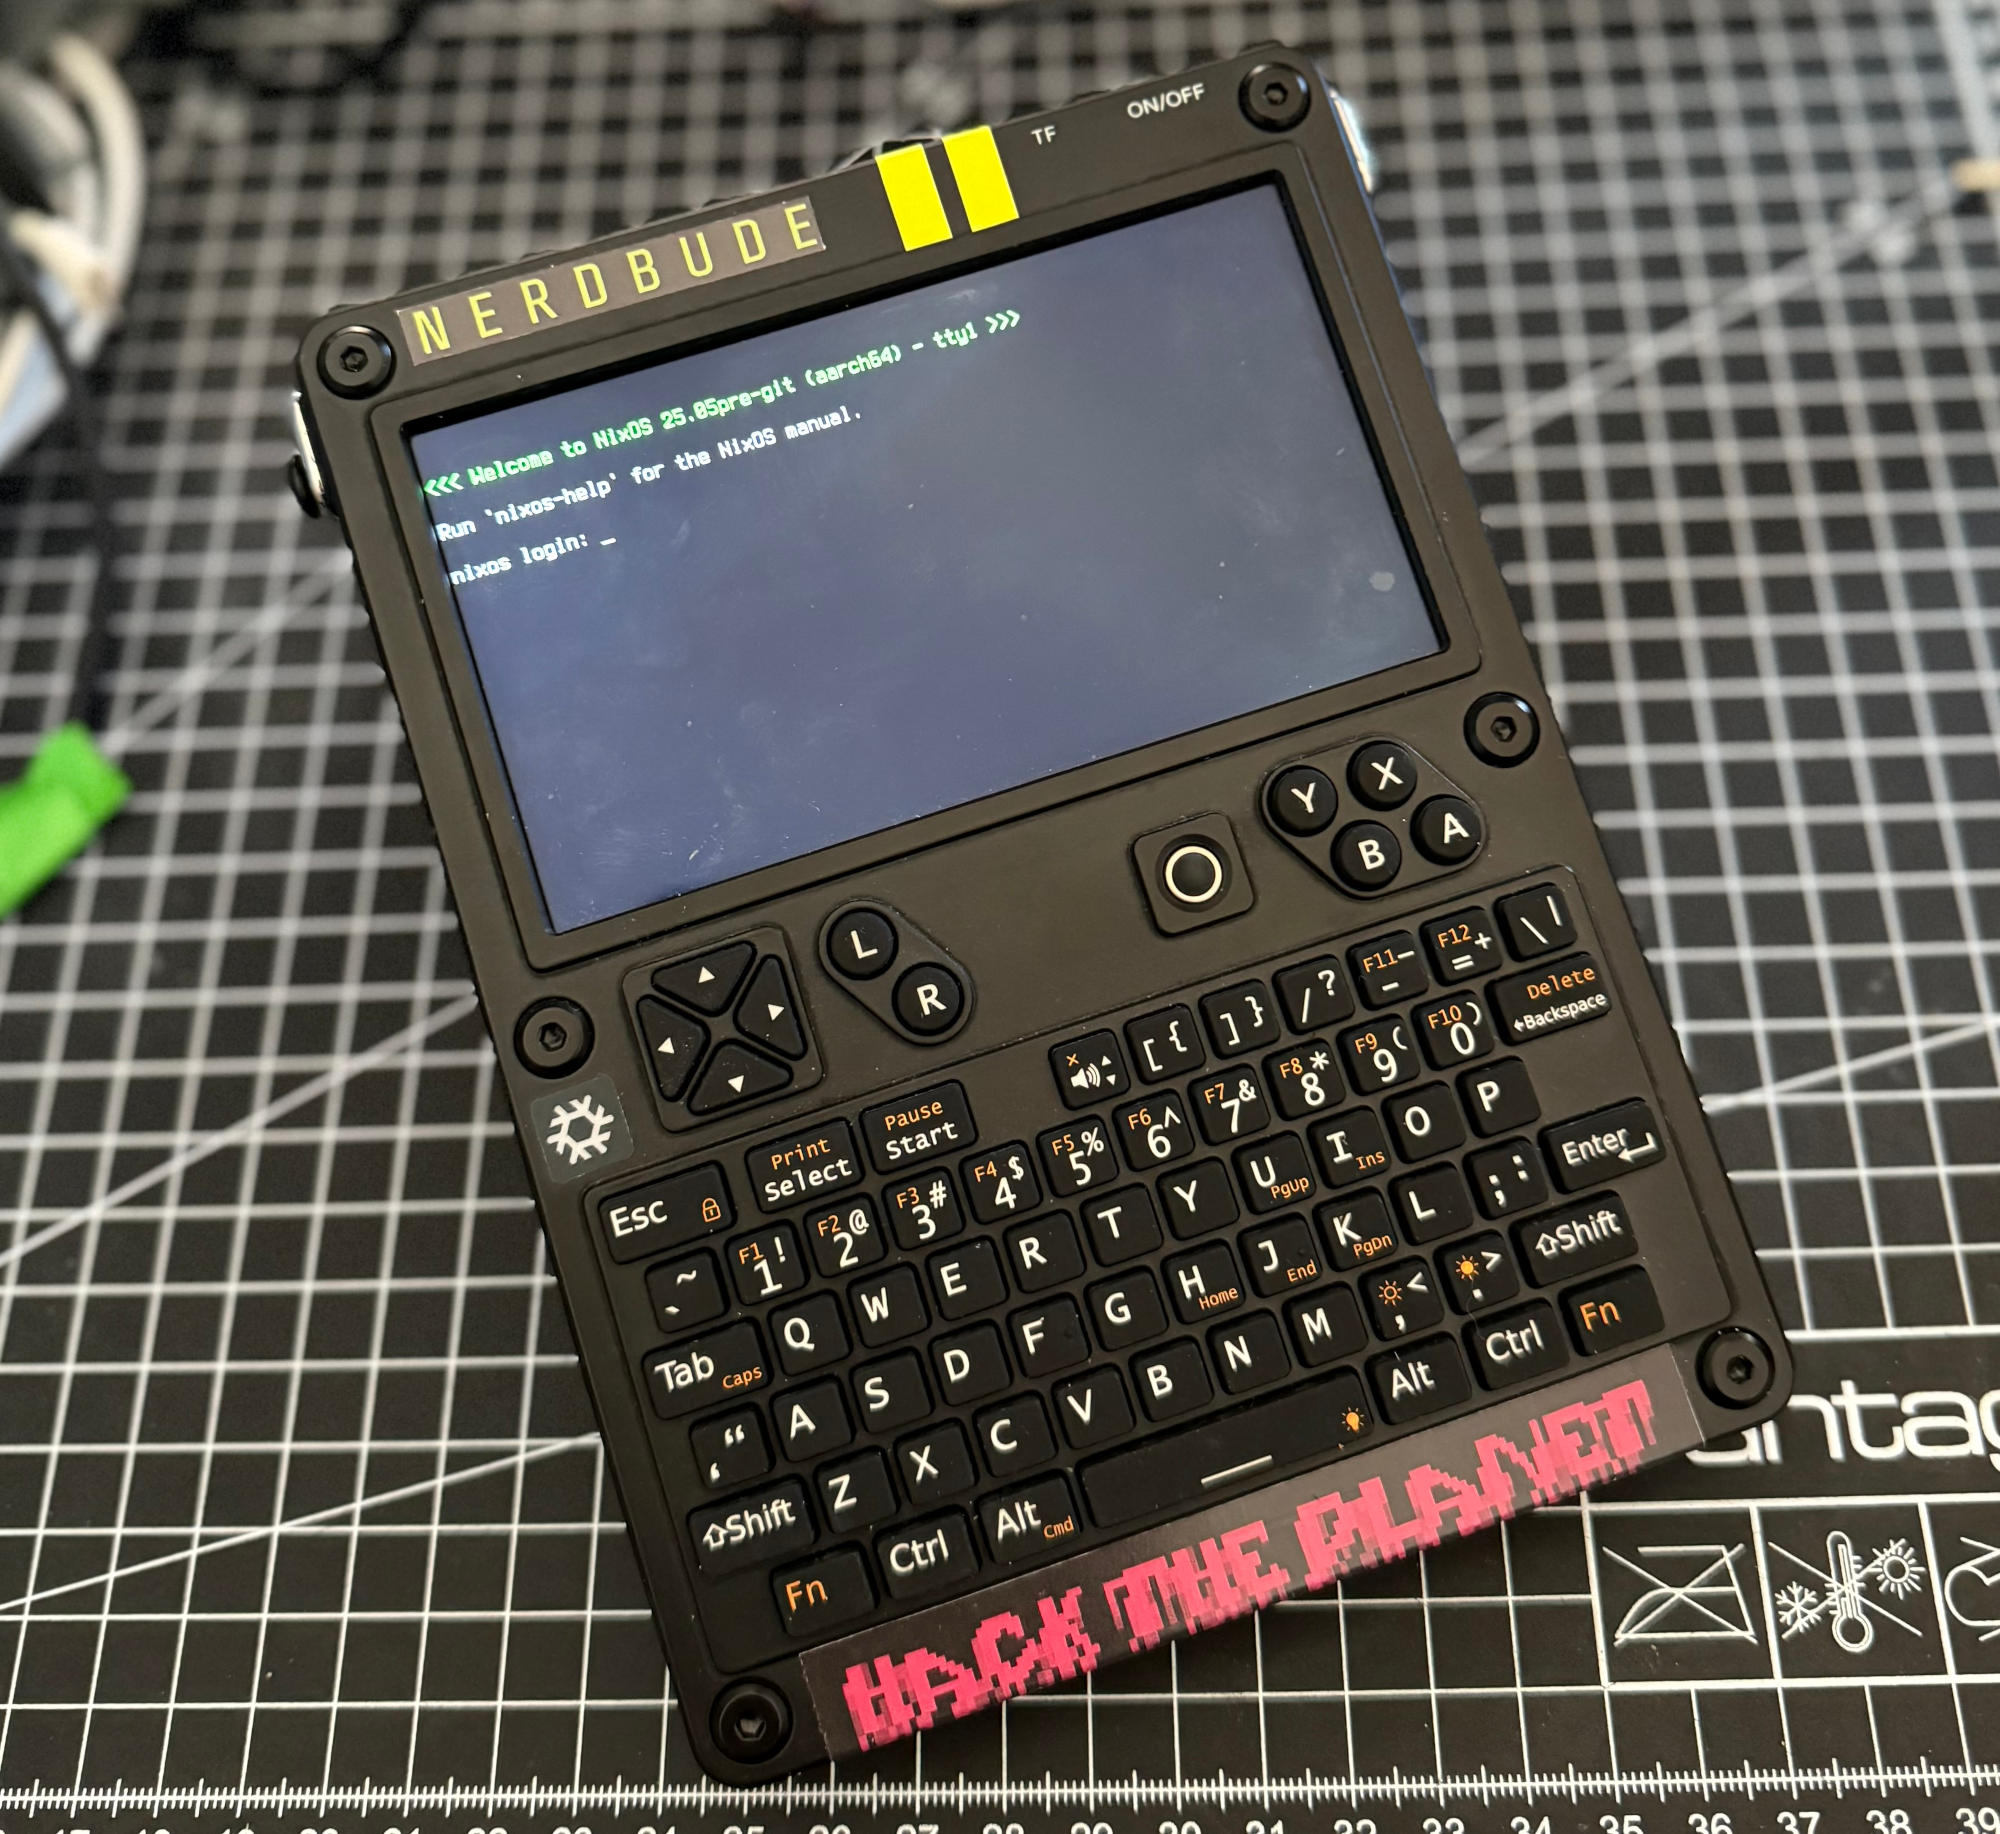
When you turn on the uConsole, you’ll now get a blank NixOS including a working screen and keyboard.
Now you can operate as you wish, just like on any other NixOS machine.
Start with configuration.nix
CONFIGURATION.NIX / MODULES
As soon as you enter the /etc/nixos directory, you’ll notice that it looks a bit different than when NixOS is installed on other machines. For example, the uConsole.nix file is also found in the directory. This controls all the important configurations needed for uConsole to run immediately after booting, such as the display, ports, and keyboard.
Everything else is, as usual, in configuration.nix.
The advantage of having your NixOS config in a Git repo is that you can simply clone the entire thing onto uConsole and import the modules via
1 imports = [
2 ./modules/zsh.nix
3 ];
in configuration.nix.
But let’s assume you don’t have a complex NixOS config somewhere that you can use. So let’s configure everything important that makes sense as a base.
The first thing you should configure is a user. Once the image is on the CM4, no user exists yet.
You can find my the entire config structure here: Github
So, first, let’s set up a user.
Whether you do this in configuration.nix or users.nix is entirely up to you. It’s only important that you also import the users.nix (if you use this option) into the configuration.nix.
Let’s assume users.nix. This would look like this (the username would be “NERDBUDE” in this case):
1 { modules, config, pkgs, ... }:
2 {
3 users.users.NERDBUDE = {
4 isNormalUser = true;
5 description = "NERDBUDE";
6 extraGroups = [ "networkmanager" "wheel" ];
7 packages = with pkgs; [];
8 };
9 }
The following entry is also used in the configuration.nix so that our users.nix can be found:
1 imports =
2 [
3 ...
4 ./path/users.nix
5 ...
6 ];
Then we rebuild our NixOS with:
nixos-rebuild switch
Once everything is rebuilt, we just need to assign a password to the user. First, let’s set a root password:
1 passwd
And then we can assign a password to our new user (NERDBUDE): The easiest way to do this is with the following command:
1 sudo passwd NERDBUDE
With that, we have root and our user are ready.
Now you can start configuring as you please. XMonad, ZSH, Alacritty, and everything else you need on your new mobile device.
What is always recommended is SSH access to the device itself.
A lot of typing and editing configurations on the keyboard is tiring in the long run. Of course, you can connect an external keyboard or simply set up SSH access to the device. For example, we could build the ssh.nix module:
1 { config, pkgs, ... }:
2 {
3 services.openssh.enable = true;
4 users.users.nerdbude.openssh.authorizedKeys.keys = [
5 "ssh-rsa #ssh-rsa-key"
6 ];
7 }
Instead of #ssh-rsa-key, you should of course store your key, otherwise you won’t be able to access the uConsole via SSH. Now just include it in configuration.nix:
1 imports =
2 [
3 ...
4 ./path/users.nix
5 ./path/ssh.nix
6 ...
7 ];
and rebuild with nixos rebuild switch, and you should be able to access the device from one computer. These are the most important things you need to build to be able to continue configuring easily. The rest is just like any other computer. Install the tools and services you need and want, and from now on, always have them with you on the go.
USECASE
The uConsole is essentially a pocket-sized laptop. With the CM4, it’s now truly usable, and you don’t have the performance weaknesses of the first RPi generations. I run the usual terminal stuff on the uConsole (IAMB for Matrix, TUT for Mastodon, aerc for mail, zellij as a terminal multiplexer, and so on). The missing 4G module for internet on the go can be quickly replaced with a mobile hotspot (of course, you shouldn’t run major updates or transfer large amounts of data back and forth, otherwise your data will quickly be used up). But the device isn’t just great for traveling. It’s usually faster than a laptop on your home network, too. The uConsole is great for small SSH sessions to the infrastructure or other tasks. The display is nice and bright and has a perfectly acceptable resolution for its size. The keyboard may not be the best (okay, I’m used to other keyboards), but the size alone makes the choice of tactile switches quite acceptable. It could have been rubber domes, too. I see the danger here in the rubber mat that covers the switches. It’s made of rubber and will eventually wear out. Currently, though, I haven’t had any problems with it. The 18450 batteries actually last quite a long time with moderate use, and when they’re empty, they can easily be recharged via the device’s USB-C cable. The aluminum case is quite robust, but you should be careful not to drop the device often, and especially not on edges – aluminum is comparatively soft and will quickly develop dents.
All in all, a solid travel device for hacking on the go.
MODS
With an open-source device, you don’t have to wait long for a small group of people to gather around and develop various extensions, mods, hacks, or whatever you want to call them. This is also true for the uConsole, of course.
For example, there are mods that aim to provide an RJ45 socket. This currently requires major changes to the case design, but will definitely be easier to accomplish in the future.
Another cool (commercial) module is the uConsole RTL-SDR/LoRa/GPS/RTC/USB Hub All-In-One Extension Board, which can connect various antennas, including SDR/LORA/GPS, and other antennas.
Of course, there are also some really cool 3D-printed mods. For example, the screen flip lid cover (which will definitely be added to the uConsole here as well). This goes even further, of course, with corner protectors or completely new cases, which are easy to build thanks to the open source files.
So, there are no limits to your imagination here.
CONCLUSION
The uConsole is not only the basis for a wide range of ideas and projects, but also a wonderful cyberdeck-like pocket device that provides a terminal lifestyle on the go. It’s fun to play around with it, learn about NixOS, or simply communicate via the matrix in the terminal while on the go.
I’ll install a separate antenna port somewhere in the future, the flip-up screen protector will be added later, and then we’ll see what else I can come up with. If you can wait patiently, have the necessary cash, and enjoy these devices, you should jump at the chance. It’s a lot of fun.
Happy hacking!
[~] BACK